Hello and thank you for calling in...

My name is Helen and I am a Photographer living in England. I started this Blog on the day that my Grandma died, three months after my Father died and several weeks before a third funeral. Initially it was a very personal way to stay connected to the people I'd lost and it helped, it really did. But writing and taking pictures everyday has opened back up a creative side that I had lost during the everyday. A big thank you to my followers, to those who take the time to comment and to new visitors, I hope we will become Blog friends too...
Showing posts with label photography projects. Show all posts

Wednesday, 14 December 2011

cherries and chocolate

Nature has been rather dull here as the Autumn glory is over and were left with a mucky brown landscape. The crisp glistening world of winter hasn't begun yet and although the berries are on the trees there is no frost to make them sparkle.

Theres a lot of rain and a lot of wind, not exactly ideal photography weather for someone who gets cold just looking out of the window.


This time last year I had gone a real pearler on the ice walking to work, one of those embarrassing legs straight from under you moments on a puddle that had iced over and been hidden by the snow. I remember it hadn't been the first dicey moment that winter so its all rather mundane this year, that we've had no decent weather to inspire or to warrant getting

frostbitten fingers for.


I'm sure if I went tramping over hill and dale I'd find something that caught my eye. The light is a dull not really bothering to try kind of light but I would think with a bit of editing....

no I'm not drawn to it.

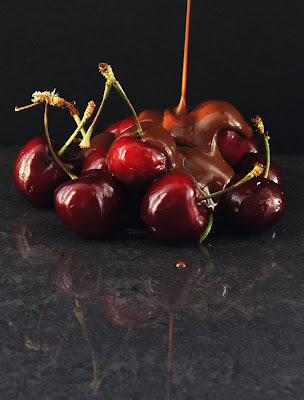
So instead of wallowing in the negative, I went to the supermarket and bought some bits to have a play with. Cue my living room window cill (with a lovely warm radiator underneath)

a spotlight, a piece of black board, a spare bathroom tile and a bar of chocolate...

perfect photography conditions I'd say!


Looking at the pictures, there are a little too many stalks and perhaps the tile could have done with being black too as its a little busy but oh the light and darks, the reflections and shadows!

Tuesday, 6 December 2011

swirls and circuits

We tried some swirly projects at photography club this time, that weren't entirely successful but have potential.
There just wasn't enough light to get a crisp clear focus of the food colouring being dropped into water. Some cameras managed to capture the mushroom shaped first clouds and following swirling shapes but my Sony and the Nikon's just weren't happy. Obviously the idea is to crop in tight on the shapes leaving no jar visible but mine here are just too blurred.
Next we tried to capture smoke from 3 distinguished matches against a black background ( a piece of card leaning on an easel) It took a lot of experimenting but the trick is to shake the matches out rather than blow them, you get more smoke that way and to pre-focus on an object just in front of the card first (a hand is good) and then move that away and quickly make the smoke. A spotlight needs to be directed on the area that the smoke will billow to really bring out the shapes. Again my camera wasn't playing but some of the group got some beautiful clear swirls.


Finally in contrast to all the swirls a member of the group had brought in some circuit boards. I was too tired by that point to really see the shots but I'll defiantly have another go with these, some of the group got some dynamic shots of them and as one member said you can get a very striking 'cityscape' feel with them held vertically.


Sometimes the atmosphere in the club is electric with fabulous pictures captured as members boundaries are pushed but this time the atmosphere was strained. They didn't really enjoy the projects, couldn't get cameras to play ball and I haven't received one excited e-mail with pictures from the night. But thats okay. Having spent years in the company of other creative people I know how just one un-sucessful attempt at creativity can make artists want to throw away paint brushes, photographers hang up cameras and crafts people throw scissors, fabric, papers and needles to the four winds. Theres nothing like a duff piece of work for convincing you that you have no talent, your waisting your time and who did you think you were in the first place for even trying!
But we live to try again, we drag ourselves out of the doldrums and have another go and when we do its very often magical....

Monday, 28 November 2011

Christmas starts here

We went to our local garden centre on the latest photography club outing with a challenge to capture 'Groups of Objects'


'Cups of Joy'
'Three Baubles'

The Christmas displays at this time of year make for exciting compositions and the bright vivid colours are wonderful. The array of different objects, whilst a little overwhelming


'Red hats and Carrots Noses'


at first are thrilling when you 'get into it' however be prepared that it will take you a few shots and bit of wondering around before you begin to 'see' the picture possibilities. Permission is needed of course.


'Masked Christmas Gold'


'Teddies on Parade'

But you do have to be prepared to be patient and a little thick skinned as no-one is


'Three Baubles II'
tolerant to a tripod and a photographer in their way so you can't really get away with taking time to compose shots, a picture from further away that you can crop in closer when you get home is much easier to achieve.


'Us Three'
and flash photography is not allowed so sometimes its difficult to stop camera shake or get enough light in the darker areas of the display.


'Trees-a-plenty'

I think the trick is to take lots of shots and be prepared to edit when you get home. Take a look at Kat's blog post on aspect ratios, it gives very useful information on cropping your images. Take the time to try your picture cropped in different ways, you could even make a copy and produce two very different images from the same original shot.

The effects are worth it, I have turned these images into very nice little Christmas cards.

Wednesday, 2 November 2011

black & white project

The project I set at the latest photography club was black & white photography. I took along a whole lot of objects and left the group to position them and the lighting to produce dynamic shots.

The idea was that arranged well, everyday objects can have huge impact in black & white.

It was so interesting to observe the different approaches of each person and how some objects enthralled and others did not inspire them.


The spoons for example were largely untouched but arranged on a mirror, given a harsh light overhead and a grainy edit afterwards I think they look good.


The cards and dice were most popular along with the dominoes and produced some fabulous shots by the group once we had the lighting right. Arranged on a simple black bed sheet with two small table lamps, the contrast and shadows were thrilling.
Half of the challenge was to be able to envisage how the shots would look in black and white as most of the cameras were taking shots in colour. My SLR can be set to black & white but I knew many of the others cameras couldn't so I had taken mostly objects that were deliberately black and white to make the challenge easier.
But for the second part of the project I'd also taken several brightly coloured objects, such as fruit and this the group found most challenging to arrange into a composition that would be dynamic without colour.

Think about the senses that you are using when you engage with an object, take a strawberry the first sense engaged is sight, you notice first the colour - bright red! Take that away and what else have you got? Smell -but how do you photograph smell? Touch - pick up a strawberry, close your eyes, what do you feel? its texture, little hairs, leafy bits -but how do you photograph that interestingly?

Have a go at photographing an object that is all about its colour but aim for a dynamic shot of it in black & white - its a challenge but it draws you into the process of really bringing out all that objects qualities in a photograph.
An example is this green apple. Take away the colour - what have you got?
Apples are shiny, they are juicy, they are round!


Polish the apple with a tea towel to really bring out the shine, stand it next to a window to emphise the shine or add light by shining a tourch onto it or even as in this shot - both!
The juicy and refreshing quality can be emphesised by spraying it with water. The lighting will make the droplets glisten adding to the effect.

Finally a shadow of an object will show its shape clearly, so stand a piece of card behind the apple and position the tourch to cast a perfect round shadow onto it.
Here is a picture of the very glamerous set used to create the photograph!

Thursday, 22 September 2011

a fun project - bubble light trails

We had a wale of a time at the photography club I run last night, trying to capture shots of bubbles being blown against a black cloth background. We turned off the lights and shone two small spotlights onto the space.
Our 'bubble blower' started to blow and we all expected to capture perfectly round bubbles with pretty colours on them but that wasn't what we got!


Our cameras struggled to pick out the bubbles at all and instead focused on the colours, causing some amazing patterns to appear on the pictures.


After a lot of faffing with settings and ISOs we got the hang of it and spent a good hour snapping, laughing and playing, with lovely results (and a bit of a mess!)


My camera is a Sony 550 with an 18 to 55 lens, which I found worked best to capture these shots on an ISO of 1600 or 3200 and an f stop of 5.6
Our bubble blower got very wet (and tired) so I'd recommend one of those toy bubble machines if your going to do it for any length of time.